Saturday, 18 February 2017

Pre-Rubric Thousand Sons: Progress


As you can see this will be no ordinary Blog, here I will be posting all work in progress images and texts for my Pre Rubric Thousand Sons force that I have been working on since obtaining the Burning of Prospero box set. I am building these for use in 40k as there are no 30k players in my area.

The narrative so far is that these Thousand Sons are unaffected by the Rubric of Ahriman, which leaves them as regular marines but susceptible to the random mutations as a result.Why this is the case I am currently undecided. To represent this on the table I will be using no Rubrics and will be using the Black Crusade Detachment from Traitors Hate for the free mutations.


So how did I get this idea? Well originally when I first purchased the Betrayal at Calth boxed game last year, I fully intended on building a formidable Iron Warriors force out of it. Shortly after the Burning of Prospero was released and I had already decided that I needed another faction for when i'm playing the board game with a non-40k player, so I snapped this up and had the obvious choice of either Thousand Sons or Space Wolves, naturally I went for the traitor faction.

As I assembled this army, I started to think about how I could use it in 40k, they are Thousand Sons for sure, but they look nothing like the Rubric Marines and Rubric Terminators, these are just regular Marines and Terminators, i'll just confuse myself and others if I start proxying these guys. I read over the narrative for the Thousand Sons and learned that up until the Rubric of Ahriman, the legion was susceptible to random mutations related to the use of their psychic powers. Now the models are 30k, so they pre-date the Rubric of Ahriman, and there are already plot devices that can explain a warband of Thousand Sons in the year 40'000 not being mustly Rubrics. We have the unusual flow of time in the warp resulting in time travel, and lets not forget the Blood Ravens, they are descendants of the Thousand Sons and are not Rubrics themselves, so I have plenty of room to figure out that part of the narrative.

I added in some appropriately converted and painted raptors from 2 years back, some unpainted Possessed and magnetised a Contemptor to act as my Helbrute. Now the force is beginning to take shape. Speaking of which, as I began to add models to the force, I needed a structure to work to, mainly to stop me from overbuying models, so I looked to the Traitor Legions book that has recently been released. This has rules for the Thousand Sons legion, however it's detachment requires the use of Rubrics and Tzaangors, the first of which my narrative doesn't allow, and the second I just don't want. So I looked back to Traitors Hate from last year and fell in love with the Rules allowing me to just keep on mutating characters every turn. A Chaos Warband and a single Spawn is the minimum that needs fielding, and I pretty much already have that.

Tuesday, 22 November 2016

Games Workshop; Finally Getting It Right

Welcome again readers,

So as you will have noticed its been a good few months since my last blog post, life got much busier and I found myself taking on a number of new projects and ideas. Now winter is upon us I have time to catch up on painting and blogging, starting with GWs recent changes in behaviour that have gotten me looking back at their franchise;

Some time ago, we heard a report from an investors meeting whereby GW announced that they were a models company, not a games one, despite their name and product. Since this controversial statement GW has made a drastic u-turn under their new leadership and i'm once again looking at their franchise in awe.

Getting into the Hobby
The entry level to the hobby has always been high, given the time and money required (not to mention the skillset) to get into it, many falter early on in the hobby. GW has historically relied on its existing customer base to recruit new blood, using only the 2 player starter sets as an incentive to get started into the hobby.

Now look back over the last 2 years. Age of Sigmar came out with essentially out of the box rules, whilst the models were really high quality, the ruleset was inviting (unlike 40k and Fantasy). Age of Sigmar received a lot of criticism from existing players, but ultimately this game will serve as an entry into the hobby.

GW has been eyeing up smaller games that are more fast paced and can be played more frequently than your average game of 40k, with smaller rulesets to bring in new players. Look first at their numerous board games, some successful, some not so much. Games like Betrayal at Calth were mostly overlooked due to the box value, customers found themselves buying the game for the miniatures, however having had a few games of this myself I am amazed at how simple GW were able to make a 40k themed ruleset. Now look at their upcoming releases, Blood Bowl and Space Hulk are being released again in time for the Christmas shopping.

I have to be honest, I also bought Betrayal at Calth to start a new Iron Warriors force and saw the box for cheap marines. However having looked over the remainder of the contents I printed out a number of Marine pictures from GWs site, laminated them and stuck them on bases. This was to allow myself and others to play the board game, as well as abuse the box for miniatures, and I would love GW to provide cardboard alternatives, however I don't see that happening somehow.

Above I have looked at GWs game design and inviting in new players through the ruleset, now lets look at the miniatures. Blood Bowl is being re-released once more and it's worth looking at the miniatures. Not only are the models snap-fit, but the plastics are coloured in the box. This means that customers can assemble the miniatures with ease and get on with the game without having to paint and glue miniatures. That is massive for GW when it comes to bringing in new blood.

FAQs, these were always internal questions that were raised and answered in an FAQ until of course GW stopped updating them a few years back. After a long and quiet spell, GW started asking for questions one faction at a time on their facebook page, then released draft FAQs for the community to look over and provide feedback. Now GW have begun to release the finalised FAQs after taking onboard the community feedback.

Things are looking up for GW, and now there's a new Chaos Legions book on the horizon i'll definitely be keeping an eye on things.


For my next article i'll be going over one of the games i've started playing over the past few months, Frostgrave.

Until next time, Happy Wargaming,

Peak Wargamer Aaron

Thursday, 30 June 2016

Beyond the Gates of Antares; Rules We Get Wrong

Following on from my previous blog, I figured I would go through some of the rules I have been forgetting, getting wrong and didn't know about at all.


Light Support Weapons (p.75)
First of all is Light Support Weapons. Go to page 75 in the rulebook and you'll find mention of these failing a res test on a roll of 10. Incredibly handy given that Ghar Outcasts with a Disruptor Cannon would otherwise fail on a roll of 5 to 10. All weapons mentioned in this section are covered by this rule.


Break Tests (p45)
If your unit rolls a 10 on a break test it is destroyed, very brutal.
If your unit fails whilst down, it suffers an additional pin as penalty.
A pass on a roll of 1 removes a pin, nice compensation given the above results.

Blast Hits (p.35)
If your unit is down and is hit by a blast weapon, things are worked out differently to other ranged weapons. Instead of re-rolling to hit, you suffer half the normal number of hits (rounded down). For example, if I inflict D5 hits on your unit thats down, and my result is 5, halved and rounded down I only scored 2 hits. The same applies to pins from Net Ammo.

Line of Sight (p.25-26)
Until recently I was somewhat baffled by the whole terrain/obstacles and line of sight part of the rules until I sat down and re-read the whole section and thought it through.


There are 2 types of terrain which can each be treated in 2 separate ways.
- Intervening Terrain/Occupied Terrain
- Obstacles/Defensive Positions

You cannot draw line of sight through more than one obstacle and/or intervening terrain. However this does not include defensive positions and occupied terrain, otherwise neither side would ever be able to shoot. A defensive position if an obstacle you are in base contact with and shooting over, and occupied terrain is a piece of terrain your unit has moved into.

Recovery Test (p.16)
These must be took if your unit is down at the end of the turn and you wish to return the order dice to the bag. This is a normal command test with penalties for the number of pins the unit has.
Pass on a roll of 1 = -2 Pins and Order Dice returned to the Bag
Pass = -1 Pin and Order Dice returned to the Bag
Fail = -1 Pin, unit remains down
Fail on a roll of 10 = unit remains down

The important thing to note here is that unless you roll a 10, you will always be able to shrug off a pin when performing a recovery test.

Rally (p.16)
The order test for this ignores pins suffered, unlike in Bolt Action. Get these games mixed up at your peril.

Assault Results (p.43)
When failing a break test following an assault, the unit is automatically destroyed, very brutal, so be careful when committing to assault.


That's all for now, don't forget to take part in the Antares 6 week campaign!


Peakwargamer Aaron

Tuesday, 28 June 2016

Beyond the Gates of Antares; Xilos Campaign

Hey all,

Following the posting of a few battle reports in the Antares campaign I figured i'd give this a shout out. The campaign is 6 weeks long and every week a new mission is introduced, based on those in the current supplement "The Battle for Xilos" and the results of the campaign will be used by Rick Priestley as the basis for the next supplement.


On the campaign website, you can sign up and immediately start posting your battle reports. To encourage quality, you are encouraged to write up your battle report, upload photos, army lists, link videos and link up your report with your opponents version. Further to this people can rank your reports and comment on them, giving you vital feedback where you need it.


Now stay with me here, you might be thinking, that sounds very boring, writing up a turn by turn analysis of every game for people for criticise? Well have a look this segment from my 2nd battle report;

"Of the remaining squads, one was constantly on its knees struggling to comprehend that Grog himself was still alive. The Imtel had clearly not anticipated that Grogs own battlesuit would still be intact. Further still Grog had passed every resistance test, break test and command test the remaining C3 squads could put on him, how was this even possible? Well Grog didn’t care." (http://battleforxilos.warconsole.com/battles/vs-s-kerman-1466539721)

My writing skills are not amazing, but you get the idea. I took an amazing event on the tabletop of a model not giving into its fate and worked it into a story, a story I intend to continue with future battle reports, where every game I will nominate a model to be Grog, and the report will be written from his perspective.

So, the reports themselves can be great fun.


If your already building an army for Antares and are searching for a player, here's a player finder recently made available in its Beta stage; https://antares.wannarumbl.com/#/login

Alternatively, if your new to the game, head over to the Warlord Games website or their youtube channel and start looking over the Antares range and choose an army suited to you!

Best Regards,

Peakwargammer Aaron!

Friday, 10 June 2016

Open Combat: A Game for Any Collector


A few weeks ago I was introduced to a game called Open Combat at my local club, and it caught me by surprise. The developer of the game Carl Brown was running demos, of which I decided to take part in. Below is something of an introduction to the game incase you have not tried it yet, obviously I cannot give you a demo in the blog, but I can show you the main appeals about the game and what I love most about it.

The main appeal with Open Combat is that you can use ANY of your miniatures, as long as you keep to a certain theme so it’s not a ragtag band of Skeletons, Eldar, Vikings and Giants. You select some of your favourite miniatures, lets say between 4 and 8 that are somewhat underused or are your best painted models that you really want to show off, and then you build a profile for those models. That’s right, you get given a blank profile for each model, and every stat, special rule and piece of wargear you give a model costs 1 point (known as renown in the rulebook).

The Nervous Archers warband I choose from the sample at the demo

Below is an example for my Welsh models that I have been using for SAGA, this is a 100 point list that took a mere 5 minutes to throw together without having to consult army lists and such;

Welsh Warband
SPD
ATK
DEF
FOR
MND
WEAPONS/SKILLS/ABILITIES/INJURIES/NOTES
Warlord
4
5
4
4
2
Sword, Shield, Javelin
Hearthguard
4
4
2
4
1
Sword, Shield, Javelin
Hearthguard
4
4
2
4
1
Sword, Shield, Javelin
Levy
5
3
1
2
1
Sword, Javelin
Levy
5
3
1
2
1
Sword, Javelin
Levy
5
3
1
2
1
Sword, Javelin

The process of army building is simple, grab a handful of models and give them the stats based on whats on the model. What weapon does your model carry? Does it have a shield? How heavy do you reckon its gear is? Above my Warlord and Hearthguard carry heavy armour, so I gave them slower movement speeds (SPD) than the levies and more health (FOR) and defence (DEF). If you have someone carrying a legendary weapon, say Excalibur, you might choose to have an insane attack (ATK) such as 15, and throw some special rules in there such as double handed to give it some special effects.

Now the rules are written based on the theme of Medieval combat, so everything is based on swords, spears, bows, shields etc. However, the rules can be used for any other period using a ‘counts as’ approach. For example, I recently used these rules to play a World War 2 game, whereby close combat weapons were uncommon and the game was played using Bows, Crossbows, Slings and Javelins to provide the variety in shooting options. Literally anything can be represented, if you have cavalry you may to up your speed (SPD) to 12, for monstrous creatures you may have 15 health (FOR) and so on.
Lets say I wanted to use my Bloodthirster who largely sits on the shelf doing nothing, here’s the first idea that comes into my head;


SPD
ATK
DEF
FOR
MND
WEAPONS/SKILLS/ABILITIES/INJURIES/NOTES
Bloodthirster
16
16
16
24
12
Double Handed Weapon, Sling, Resolute, Intimidate

See what I did there, quick moving due to the wings, a few special rules that fits the model and it totals 88 points quite appropriately. Looking back in a week or so I will probably make some changes to better field the bloodthirster, but if your opponent asked “Can I fight a Bloodthirster?”, you only have to ask yourself “Do I have one?”.


The gameplay is very simple, the rules are written from a common sense point of view with regards to mechanics like stabbing enemy models in the back or pushing them over into a thorn bush. Using up to a dozen models per side you won’t have to remember a great many things, which helps the game really fun, you spend so little time thinking about rules and much more thinking, how would this little guy fight?


Most of what you need to play the game is found on the quick reference sheet, so you won’t find yourself looking up many rules in the book. And most importantly, a 100 point game can have so much go on in it, and yet only last for between 30 and 60 minutes, excellent for an evening game when you don’t have 2+ hours to spare for larger games. Each side requires a mere 3 dice (D6), 3 tokens which can be anything, tape measure, pen & paper to write your armies stats on and record your losses. Did I mention that the table size is typically 24”x24”? So you can fit this game onto any kitchen table.

If you wish to look any further into the game, please see the links below;
Store and Forums: www.secondthunder.com/
Second Thunder Youtube Channel: www.youtube.com/channel/UCiYQd5PurA7IwC6Q1P6nk4Q

If there's anything more you wish to know about this game visit the forums via the second thunder website, and if you feel I missed something feel free to comment below.


Happy Wargaming,

PeakWargamer Aaron signing off

Friday, 27 May 2016

Tutorial: Beginners Quick Painting Tips

This time last year I started experimenting with new painting techniques, having steadied my hand I was able to paint quite clean compared to my previous work, however painting was a painstakingly slow process. I had already used wash paints at this stage also, however they were used primarily as finishes for miniatures, as these provided a shade across the whole model and made the details in the model stand out.

Since then I have moved on with my painting techniques to drybrushing, and I have found there is a great way to get details into your miniatures quickly without any prior training. In this tutorial I will show you the basics in getting details into your miniatures whilst watching television (seriously, its that easy).

What you'll need;
  • A set of cheap brushes (don't get expensive ones until your confident you won't ruin them, otherwise it will cost you), one of these will need to have a flat end for drybrushing
  • Tissue to clean/dry your brush, maybe even one of those spongy pads that come in metal blister packs
  • Water to clean your brush
  • A Range of paints, such as Light, Medium & Dark Green as used in the example below
  • Wash Paint, either the colour to match your scheme such as green, alternatively go with a Black or Brown wash paint to start with
Unfinished German Heer HQ 
(awaiting some real attention)

Step 1: Basecoat
First of all you'll need that basecoat, if you have the appropriate primer spray you can save yourself alot of time. In my case I lacked the appropriate primer spray, and had to individually basecoat my miniatures. I started with a dark green paint with the German Heer above.

Step 2: Drybrush
The basics of drybrushing is to pick a flat ended brush, not your typical pointy brush, dab a tiny amount of paint onto it (and I mean tiny), and then wipe most of that paint off again on the tissue until there is only the tiniest bit left. Now quickly and aggressively brush your paint brush across your miniature.

The strokes should be quick, and you should only notice small changes in the shade of you model across the raised areas. Keep repeating this until the shade is what your after. If you use too much paint and you get a large smear of paint on the model, don't worry, this can be remedied if done quickly, get a very wet brush and dab the area to keep it moist and start sponging away at it until the smear of paint has been soaked up.

For the Paint, I would suggest using a lighter colour paint than the paint that is already on the model, the idea is the make the raised areas stand out.

Step 3: Wash
Now get any old brush and apply your wash paint to the model. Some people prefer to use the Army Painter 'Dip', as this can be a fast way to get your models washed/shaded. Otherwise your wash paints will suffice, here I used the Citadel Biel-tan Green Shade paint.

The wash is very runny, make sure that it seeps into the cracks in your miniature, as your trying to get at the recesses and make them stand out. As I child I believed people hand painted every tiny detail, but even if that were true, this is so much easier and produces great results. Be sure to mop up the excess, otherwise this may take some time to dry.

Step 4: Drybrush again
As before, drybrush your miniature, only this time choose a different paint. In the example above I chose an even lighter green than before and drybrushed alot less aggressively than before. What I was trying to achieve was a transition, where the recesses had the darkest green and the raised areas had the lightest.

Step 5: Experiment
And experiment, change the order around and the paints you have used, see what works best for you. You'll never know what you can achieve unless you try.

Below are a few examples of where drybrushing and washes work quite well;

This guy was painted exactly the same way as above. He was painted as part of a box of 20+ Pioneer Grenadiers, after the above process I painted on the flesh and the metal, applied a wash over said areas and was done.

You'll notice also that concrete feel to the base. What I did here was PVA some sand/debris to the base immediately after I had assembled the miniature, and once it was dry I primed the model (among many others) with a grey primer spray. What little paint made it onto the base as I went along was covered over at the end with grey paint. Again a simple effect that anybody can achieve.

These Concord I had no inspiration to paint at all, and so I painted them mostly whilst watching TV. Basecoated dark blue, I worked my way to lighter colours with a blue wash in the middle. Not bad considering I haven't put any real work into them.


These Ghar were painted as above before and detail painting, and were finished with a light metalic drybrush. The metallic areas received a metal base, nulin oil wash and some metal drybrushing to give it that worn feel.

And that's all for now folks, if you have any questions feel free to comment below. I hope this will make you all more confident at painting your backlog of miniatures.

PeakWargamer Aaron

Saturday, 14 May 2016

Hobby: Magnetising the Burning Chariot of Tzeentch


Hey all,

So, I recently received my second Burning Chariot of Tzeentch, the first one I assembled a couple of years ago as 2 Screamers, 1 Blue Scribes, 1 Exalted Flamer, 1 Herald on Disc and 1 Horror. This time around I am building the kit properly, and as usual have looked towards magnetising it.

Having looked online, there was a lack of material to show me how best to magnetise this kit, and one individual on the Miniwargaming forums indicated that it simply wasn't possible, so I rose to the challenge.
  

Magnetising isn't necessary for being able to switch between the Herald and the Flamer, however not doing so means ditching the fancy outer disc. The ball joint used to connect the characters base to the stand is secure enough, and can be further secured with either pinning, magnets or even blu-tac, that bits entirely up to you as in this blog I will be focussing on magnetising the outer ring.

1. Materials & Equipment
Firstly, you will need your magnets, I recommend the usual 3mm x 1mm magnets, of which you will only need 4. Now you need 2 metal discs with a hole in the centre, preferably 23mm outer diameter and >6mm inner diameter. For this I picked up a pack of M12 washers from my local discount store, these were precisely 23mm across. To name other eligible materials around the house, you could try a spare keyring or neatly bending a paperclip into a perfect circle, but i'd recommend the washer.

In addition you'll require your usual superglue, a craft knife for when the magets stick in the wrong place and some blu-tac for dry runs.

2. Magnets
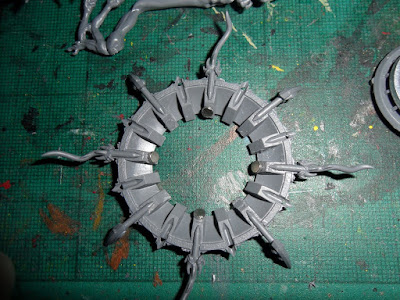
Look at the picture below, what I did here was space out the 4 magnets evenly around the edge, pointing inwards. I did no cutting away of the plastic here, I simply glued the magnets onto the base. Don't worry about getting the polarity of the magnets the right way around, these won't be connecting to other magnets so you won't have any trouble either way.

However, ensure that the magnets are 1mm-2mm from the inner edge, as the magnets will jut out slightly given the angle that they will be glued on at, and you will need to fit your washer in through that gap. Don't space them much further away either, as the magnets will have less of an effect if they cannot make contact with the washer later on.

3. Washer Bases
Following the image below, simply glue your washer or equivalent onto one of the bases that fits into the outer ring. A little cutting away may be required to get it to stick.

Following this give it a trial run and check that your base still slots into the outer ring as before, if you struggle to manage this, check that the washer is perfectly lined up and that the magnets are positioned the right distance away from the inner edge.


4. Finished, onto painting
Once you've tested the configurations your good to go and start painting. Here's some photos showing the final results, as you can see I can have both characters on foot, disc or charriot;


I hope you'll find this helpful, if I encounter any more difficult kits such as this i'll be sure to post tutorials up on here.

Thanks for reading,

PeakWargamer Aaron.